Atraumatic Extraction procedure causes the least amount of damage to the surrounding soft and hard tissues. This procedure helps to preserve the bone during tooth extraction, primarily the buccal plate. In case of damage or crack in the bone, the socket collapses and compromises future implant placement, fixed crown and bridge esthetics, and the stability of removable prosthetics. To maximize the bone healing and regeneration process, the dentists must have a complete understanding of following key points;
- How to maintain hard and soft tissue after an extraction
- The healing process of the extraction socket
- Indications for socket grafting and
- Types of grafting material and membrane that are indicated
The dentist must also understand the consequences of tooth extraction relating to the hard and soft tissues. Over the past years, it has become the standard of oral health care to preserve the soft & hard tissues whenever possible for long-term oral health, function and esthetics. Ridge preservation is the most important in any extraction situation, particularly if there is a need of future implant placement.
The wound healing is a complicated and slow process. The research studies have shown that the alveolar ridge undergoes on average a horizontal loss in width of 3.8mm and vertical reduction in height of 1.24mm over the time of six month after tooth extraction.
The wound healing process includes a complicated cascade of biochemical and histologic events. A systemic review of extraction site remodelling has shown that the alveolar ridge undergoes on average a horizontal loss in width of 3.8 mm and a vertical reduction in height of 1.24 mm during the six months after extraction [1]. Following extraction, the buccal plate exhibits a greater degree of bone resorption in comparison to the lingual plate, which results in an alteration of the position of the residual ridge. This may adversely affect implant positioning, leading to difficulty in successful implant placement and positioning. Therefore, it is imperative that teeth are extracted in an atraumatic manner in order to maximize and maintain the volume of the hard and soft tissues to increase future implant success [1].
Conventional Tooth Extraction:
Conventional tooth extraction forceps along with root elevators have been used in the tooth extraction procedure. In Conventional extraction, the tooth is usually rotated in a buccal-lingual direction, which may result in weakening or fracturing of the buccal or lingual plate. An elevator is most commonly inserted mesially or distally with a leveraging or wedging force, which also may traumatize the hard and soft tissue. This conventional tooth extraction procedure may result in a full array of complications, including the loss of a bony wall, disruption of the blood supply, compromised healing, and an increase in inflammation, infection and soft-tissue damage. Therefore, all teeth indicated for extraction should ideally be removed with care and preservation of the hard and soft tissues.
Atraumatic Tooth Extraction:
There are four basic principles that should be applied for an atraumatic tooth extraction.
1. Sever the Connective-Tissue Fibers
The first step is to completely sever the connective tissue fibers by incising circumferentially around the tooth. If these fibers are not severed or cut prior to the tooth extraction, it is likely that a trauma to the soft tissue will occur. Vigorously tearing these connective tissue fibers may lead to increased bleeding, delayed healing, increased postoperative discomfort, and alteration of the bundle bone surrounding the tooth extraction. The periodontal ligament fibers can be severed with the use of a surgical blade or thin periotome instruments.
2. Minimize Tissue Reflection
The soft-tissue drape surrounding the teeth is directly affected by the reflection of the periosteum and often recedes to adapt to the residual ridge form. The soft tissues are more vulnerable to surgical trauma and reflection than are the hard tissues. The sulcular and surrounding soft tissues should ideally remain undisturbed during tooth extraction procedures to prevent further dimensional loss. Therefore, the soft tissues should not be reflected, if possible, as doing so increases the likelihood of soft-tissue retraction and shrinkage during the initial healing, especially in the interdental papilla region.
Normally a flap is raised when the buccal plate is not intact or surgical extraction of the tooth is indicated. If a tissue flap needs to be raised, an envelope flap, which includes no vertical extension, is recommended. Vertical incisions may compromise the blood supply and delay healing of the area. Whenever the periosteum is reflected, cells are injured and need to regenerate before the remodeling process begins. The cortical bone receives more than 80 percent of its arterial blood supply and facilitates 100 percent of its venous blood return through the periosteum [2]. In some situations, reflection of the tissue is necessary and should therefore be as conservative as possible.
3. Section Multi-Rooted Teeth(s)
The next step is to evaluate the crown and root anatomy. This is especially important for divergent, multi-rooted teeths. If the roots of the tooth to be extracted are divergent, they should be sectioned and removed as individual units, rather than risking fracture of the roots or surrounding bone. When the roots are fractured, there is an increased risk of bone fracture and excessive bone removal to retrieve them. If bone removal around the tooth is necessary because the tooth is fractured or decayed to the bony crest, it should ideally be at the expense of the lingual alveolus, rather than the thinner labial bone.
4. Reduce Teeth(s) Contact Areas
The pathway of extracting tooth can be obstructed by the position of adjacent teeth at the extraction site. If the mesial and distal surfaces of the tooth to be extracted are not reduced, instruments or pressure may chip the enamel or restoration of the adjacent tooth during extraction and may alter the pathway of removal, which is more likely to fracture the roots, bone or both. To minimize damage to the hard and soft tissue, reduce the contact areas of the tooth to be extracted. This will allow the tooth to be loosened, thereby enabling an easier, less traumatic path of tooth removal.
Atraumatic Extraction Instruments:
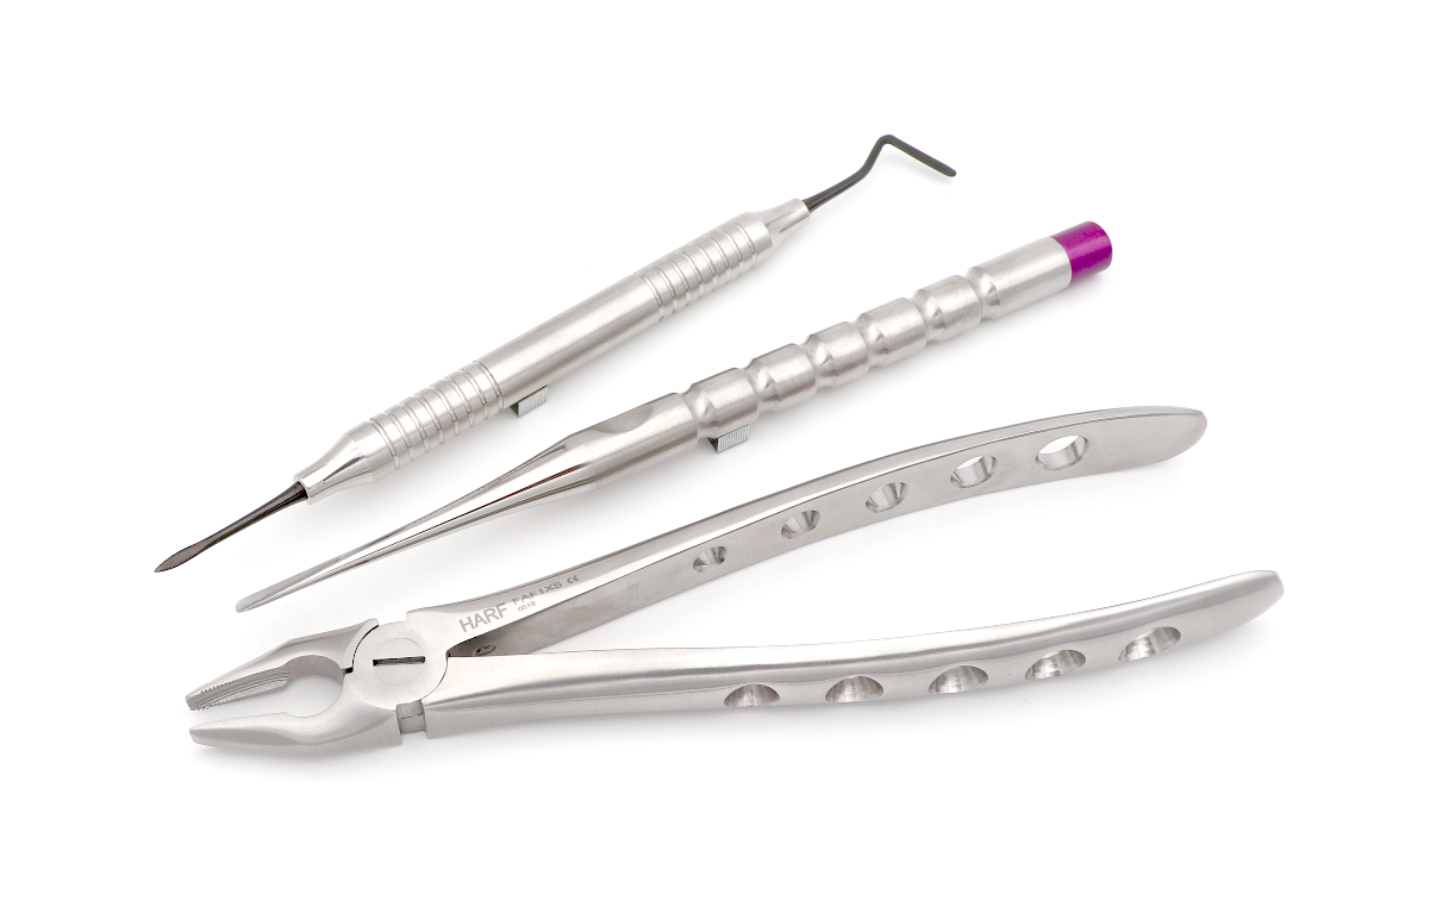
One of the most important instruments set used in the atraumatic extraction technique is the Proximators set as shown in the following picture. Proximators (also known as Periotomes) are specialized extraction instruments designed to be placed in the periodontal ligament space with vertical pressure along the long axis of the tooth root. These instruments are thinner and flatter than conventional root elevators. When used properly, a Proximator may remove a tooth or retained roots without damaging the alveolar plates or traumatizing the soft tissue. In addition, Proximators facilitate the removal of teeth without the reflection of the soft tissues, which maintains the blood supply and allows for better healing.

Periotome or Proximator Technique:
Step 1: The long axis of the Proximator blade should be inserted into the interproximal region along the long axis of the tooth root, which protects the facial plate of bone, with the tip of the Proximator or Periotome blade located within the crest of the alveolar bone. The instrument is then pushed deeper into the periodontal ligament space or tapped with a mallet into the space along the mesial and distal root, severing the periodontal ligament immediately below the alveolar crest and wedging the tooth against the opposing cribriform plate. The Proximator should never be used on the facial plate, as this may damage the facial bone, which is typically thin.
Step 2: A period of 10–20 seconds is allowed to elapse while the instrument is in place. This allows biomechanical creep to occur to the bone and periodontal ligament. Creep is defined as a phenomenon in which a material continues to change shape over time when a constant force is applied. As the tooth is pushed against the opposing alveolus, it will begin to expand the bone and allow the tooth to exit the socket. This process is much more effective when there is no adjacent tooth contact.
Step 3: The Proximator or Periotome is then gently pushed farther down into the periodontal ligament space toward the root apex, often using a mallet and light tapping force. This process continues along the crestal one third of the tooth. At the completion of this procedure, the tooth is often slightly mobile.
Step 4: The Proximator or Periotome may then be converted to a lever. The blade of the periotome is typically 3–4 mm wide. When the handle is slightly rotated, one side of the periotome is applied to the tooth root and the other side to the cribriform plate. The width of the “wedge” is now the length of a lever, which magnifies the rotation force (moment). The rotation of the periotome handle increases both tooth mobility and the force against the opposite cortical plate to further expand it within physiologic limits. Care should be exercised to use slow, gentle pressure to minimize the possibility of fracturing the periotome tip.
Step 5: Because most tooth sockets are tapered, the lateral force on one side of the tooth is converted to a coronal direction force on the other side, and the root will begin to avulse out of the socket. The Proximator or Periotome is pushed farther apically, toward the root apex, as the mobility increases. Additional time and elevation may be required if significant tooth mobility is not achieved.
In some situations, the tooth will be mobile and may need to be removed with traditional dental extraction forceps. The extraction forceps should not be applied to the tooth until significant tooth mobility is present, thereby preserving the buccal plate. Once significant mobility exists, the dental forceps are used to ultimately grasp and deliberately rock the tooth back and forth until the tooth is easily removed from the socket.
Summary:
The atraumatic extraction technique is a crucial component of the ridge preservation process. By following this technique, the quantity and quality of bone will be preserved, along with the gingival architecture. This will ultimately lead to more predictable implant positioning and placement. By adhering to the basic principles of atraumatic extractions and the use of Proximator or Periotome, a more predictable healing pattern may be obtained, as the vitality of the periodontal ligament and the surrounding blood supply is maintained.
References:
[1] Hammerle CH, Araujo MG, Simion M; Osteology Consensus Group 2011. Evidence-based knowledge on the biology and treatment of extraction sockets. Clin Oral Implants Res. 2012 Feb;23 Suppl 5:80-2.
[2] Roberts WE, Turley PK, Brezniak N, Fielder PJ. Implants: Bone physiology and metabolism. CDA J. 1987 Oct;15(10):54-61.